
CT Tag for PO-Concept by using her PTU Kit - Hoot Hoot
(You can get it from PFD)
and PTU tube "Lady with Owls" by alfadesire


(Click the images to enlarge)
Preview of the kit
Some Extras Snags
Please leave some love if you snag them xoxo
Tutorial - Hoot Hoot
✎ Supplies Needed:
✔ Programs: Photoshop - I use CS5, but any version should do.
✔ Tube of Choice: Any tube you like. Here I use PTU Tube "Lady with Owls" by alfadesire in PFD.
✔ Scrap Kit: Hoot Hoot by PO-Concept. You can get it in PFD
✔ Mask of Choice: Any mask would do. Here I use #116 from Gems Taggin' Scraps.
✔ Font of Choice: Any font you like. Here I use Nenuphar of Venus
------------------------------------------------------------------------------------
☼ Open a blank image with 600x600 (pixels).
☼ Place the mask. Click File > Place > Select the mask > Resize it to 600x600 (pixels) so it will be at the same size as the background layer.
☼ Add a new layer (name it layer 2) → Fill it with foreground color.
☼ Click the mask layer on the layers panel. → Go to menu bar and click Select > All, and then Edit > Copy. → Click layer 2 on the layers panel. → Press Q on your keyboard → Go to menu bar and click Edit > Paste → Press Q on your keyboard again → Click "Add Vector Mask" icon in the bottom of the layers panel (it's next to fx icon). → Delete the original mask layer.
☼ Now add blending to layer 2. → Double click on the layer 2 layer in the layers panel > Click Color Overlay > Change color to #a3a0d2.
☼ Copy and paste the tube → Resize to 55 % → Put her in the center of the canvas
☼ Copy and paste element 80 → Rotate -73.76°. → Move the element 80 layer below the tube layer in the layers panel. → Put it a bit right so it will be on the right side behind the tube.
☼ Add a new layer (name it layer 5) → Fill it with foreground color. → Move the layer 5 layer below the element 80 layer in the layers panel. → Erase the parts that are outside of the frame.
☼ Copy and paste the tube (the one in its original size, not the resized one that we used previously) and name it layer 6 → Right click on the tube layer in the layers panel > Select Create Clipping Mask. → Add blending 1 > Apply any grid texture you want to it. → Add blending 2 > Color Overlay > Blend Mode: Hue ; Choose color #e3bcf5
☼ Hold ctrl key and select the element 80 layer, layer 5 and layer 6 in your layers panel. → Go to menu bar > Layer > New > Group from layers, name it Frame Group 1
☼ Copy and paste element 65 → Rotate -9.8°. → Put it a bit left so it will be on the left side behind the tube.
☼ Add a new layer (name it layer 7) → Fill it with foreground color. → Move the layer 7 layer below the element 65 layer in the layers panel. → Erase the parts that are outside of the frame.
☼ Copy and paste the tube (the one in its original size, not the resized one that we used previously) and name it layer 8 → Right click on the tube layer in the layers panel > Select Create Clipping Mask. → Add blending 1 > Apply any grid texture you want to it. → Add blending 2 > Color Overlay > Blend Mode: Hue ; Choose color #d7e3fc
☼ Hold ctrl key and select the element 65 layer, layer 7 and layer 8 in your layers panel. → Go to menu bar > Layer > New > Group from layers, name it Frame Group 2
☼ Copy and paste element 48 → Resize to 54.2% → Rotate -28°. → Put it on the lower part of Frame Group 2
☼ Duplicate element 48 → Flip horizontal → Rotate 43.94°. → Put it on the lower part of Frame Group 1
☼ Copy and paste element 111 → Resize to 83.03% → Add blending > Outer Glow > Choose color #ffffff → Put it behind the tube's waist
☼ Copy and paste element 78 → Flip horizontal → Move the element 78 layer below the layer 2 layer in the layers panel. → Move it toward top of the canvas a bit
☼ Copy and paste element 106 → Resize to 92.57% → Put it on the top half of the canvas
☼ Duplicate element 106 → Flip vertical → Put it on the lower half of the canvas
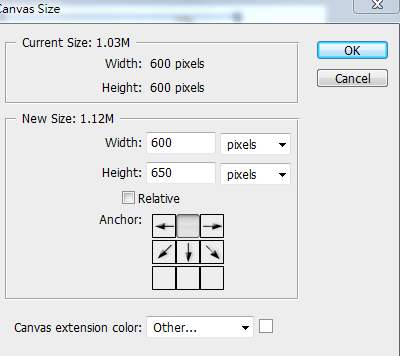
☼ Go to Menu bar > Image ? Canvas Size > Change Height to 650 pixels; Anchor: Deselect the top arrow; Canvas Extension Color: #ffffff. (as you can see the screenshot below)
☼ Copy and paste element 33 → Resize to 76.54% → Move the element 33 layer upon the the tube layer in the layers panel. → Put it on the bottom of the canvas.
☼ Copy and paste element 47 → Flip horizontal → Resize to 62.89% → Put it on the right side of element 33.
☼ Add your name/text to it.
☼ Copy and paste the tube → Resize to 55 % → Put her in the center of the canvas
☼ Copy and paste element 80 → Rotate -73.76°. → Move the element 80 layer below the tube layer in the layers panel. → Put it a bit right so it will be on the right side behind the tube.
☼ Add a new layer (name it layer 5) → Fill it with foreground color. → Move the layer 5 layer below the element 80 layer in the layers panel. → Erase the parts that are outside of the frame.
☼ Copy and paste the tube (the one in its original size, not the resized one that we used previously) and name it layer 6 → Right click on the tube layer in the layers panel > Select Create Clipping Mask. → Add blending 1 > Apply any grid texture you want to it. → Add blending 2 > Color Overlay > Blend Mode: Hue ; Choose color #e3bcf5
☼ Hold ctrl key and select the element 80 layer, layer 5 and layer 6 in your layers panel. → Go to menu bar > Layer > New > Group from layers, name it Frame Group 1
☼ Copy and paste element 65 → Rotate -9.8°. → Put it a bit left so it will be on the left side behind the tube.
☼ Add a new layer (name it layer 7) → Fill it with foreground color. → Move the layer 7 layer below the element 65 layer in the layers panel. → Erase the parts that are outside of the frame.
☼ Copy and paste the tube (the one in its original size, not the resized one that we used previously) and name it layer 8 → Right click on the tube layer in the layers panel > Select Create Clipping Mask. → Add blending 1 > Apply any grid texture you want to it. → Add blending 2 > Color Overlay > Blend Mode: Hue ; Choose color #d7e3fc
☼ Hold ctrl key and select the element 65 layer, layer 7 and layer 8 in your layers panel. → Go to menu bar > Layer > New > Group from layers, name it Frame Group 2
☼ Copy and paste element 48 → Resize to 54.2% → Rotate -28°. → Put it on the lower part of Frame Group 2
☼ Duplicate element 48 → Flip horizontal → Rotate 43.94°. → Put it on the lower part of Frame Group 1
☼ Copy and paste element 111 → Resize to 83.03% → Add blending > Outer Glow > Choose color #ffffff → Put it behind the tube's waist
☼ Copy and paste element 78 → Flip horizontal → Move the element 78 layer below the layer 2 layer in the layers panel. → Move it toward top of the canvas a bit
☼ Copy and paste element 106 → Resize to 92.57% → Put it on the top half of the canvas
☼ Duplicate element 106 → Flip vertical → Put it on the lower half of the canvas
☼ Go to Menu bar > Image ? Canvas Size > Change Height to 650 pixels; Anchor: Deselect the top arrow; Canvas Extension Color: #ffffff. (as you can see the screenshot below)
☼ Copy and paste element 47 → Flip horizontal → Resize to 62.89% → Put it on the right side of element 33.
☼ Add your name/text to it.
☼ Add the required copyright/credit
☼ Select Eraser tool. → Adjust opacity to 9%. → Erase the tube's legs a bit so it would not look like being cut off.
☼ Select Eraser tool. → Adjust opacity to 9%. → Erase the tube's legs a bit so it would not look like being cut off.
☼ Delete the background layer and save it in jpg or png format
------------------------------------------------------------------------------------
Thank you for following the tut. If you have any question regarding the instruction of this tut, please don't hesitate to leave a comment or message me HERE. :) xoxo
No comments:
Post a Comment